Thursday, August 28, 2008

IES plugin for Sketchup

IES have released a plugin that allows Sketchup direct access to all the IES tools including the Free VE-ware, VE toolkits as well as the full <Virtual Environment>.

http://www.iesve.com/content/default.asp?page=s156

 ketchup

Interestingly this is compatible with both the free and pro versions of Sketchup. This is obviously an interesting move on IES's part as they are looking to drag the average architect who may not be using a BIM tool forward, by enabling environmental analysis directly from Sketchup. This is great news for the shift towards environmental design, but I doubt it will really concern the Revit user that much and does really help the whole BIM process. Although Sketchup may be good at the concept design, those that have learned to master Revit's massing tools will see more benefit by going direct to IES and cutting out the middle man. But that's just my view.

Displaying your levels at the correct above sea level

This query comes up on a regular basis; How do I display my levels at the correct above sea level? You may be mistaken to think that everything in the world of Revit is flat and new users often get confused by levels, thinking that they should actually move the levels vertically to the correct above sea site level. It is possible to do this, but what if you've started your project and only later do you get the correct survey information. The golden rule is never to move your project, in plan or vertically, I can assure you, Revit does not like this at all. So how do we solve this problem? Well we can setup levels to display the "Elevation base" as shared.

The principle is to move the coordinate system, but not the model, similar to sharing coordinates in plan. So to adjust the default project level of 0m to +16.400m you need to do the following.

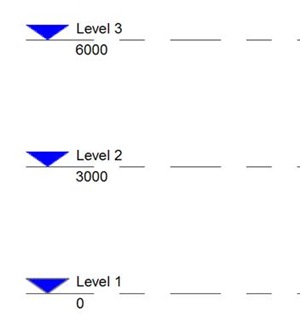
Start by going to any elevation view and zooming into level 1 or level 0, depending on how your template defines the first level.

clip_image001

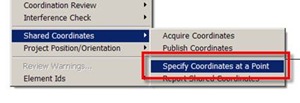
Next go to the tools pulldown menu and select shared coordinates > specify coordinates at a point.

clip_image002

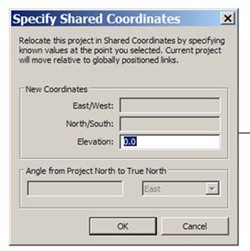
You will discover that you pointer will change to a target. Select your lowest level with the target. This will open up the following dialogue box.

clip_image003

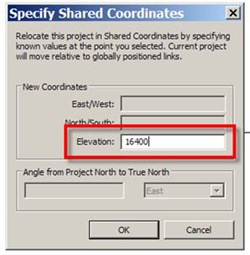
In the elevation field, type in the level you actually require. In this case 16400.

clip_image004

Once you’ve typed the value in, exit out of this dialogue. If you take a look at the levels, nothing seems to have changed. What we actually need to do is to get Revit to display the level as "shared" rather than "project" . To do this select level 1 and go to element properties.

clip_image005

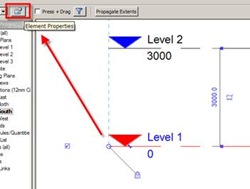
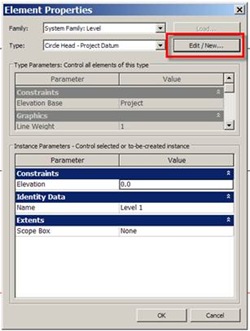
This will open up the element properties window. Click the edit/ new button…..

clip_image006

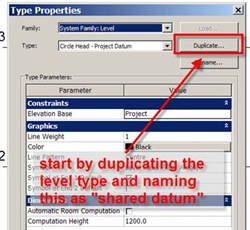
We will now create a new level type, which will allow us to display the elevation base units of shared rather than project. Start by duplicating the default level type and renaming this something like “shared datum”.

clip_image007

Next we will edit the new level type and change the Elevation Base from “project” to “shared”. Once you’ve done this click “apply” and exit out of the type properties dialogue, then exit out of the element properties dialogue.

clip_image008

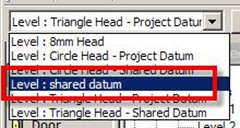
Finally, select all the levels in your elevation view, then go to the type properties drop down menu and select the previously created “shared datum” level type from the type selector.

clip_image010

Your project will now use the Shared datum level type with the elevation base set to “shared” and therefore all your levels will display the correct above seas level. You can easily swap back to the “project” level type by selecting the levels and using the previous level type which had its elevation base set to "project".

clip_image001[4]

Saturday, August 23, 2008

Waterman and Revit Structure

mall_dome_roof_under

A fellow Revit user, Mike Hacker, has setup a rather useful Revit Structure blog which is well worth taking a look at.

http://www.revit-waterman.blogspot.com/

Mike works as a CAD manager for the Waterman Group and is very keen advocate of the Revit technology. You will find some useful tips as well as some great project examples. For those that don't know, the Waterman Group is one of Britain’s premier, multi-disciplinary engineering and environmental consultancies, delivering both small and large-scale projects nationally and internationally.

Wednesday, August 13, 2008

More Concrete Balusters and Railings

Not one for blatantly copying!! :-) I recently used the Concrete Balusters and Railings families that Steve describes in this thread in a sample project. This was to prove to a "doubter" that Revit could do this sort of complex stair design. Thanks Steve.... ;-)

stair_01

stair_02

Curtain Walls as Railings

I read with interest Steve Staffords recent blog with regards to the challenges of configuring railings and I have encountered similar issues. I was also surprised to see his statement about the use of railings in the early days having similar functionality as curtain walls.

Around 18 months ago I received a query from a Revit user who was having issues using one of the stock railing families which is supplied and can be found in the system family files when you install Revit Architecture. The user simply wanted to use system railing family called "Commercial - Glass w Fixings" on a balcony, however with all the will in the world he could not get the family to work correctly, especially as the balcony was not them deep.

In reality he may of been better off creating a custom family to suite the condition, but not every balcony on the project was identical. He also wanted to flexibility to rapidly change the design of the railing as required. So what I suggested was creating a custom curtain wall panel and nesting this into a curtain wall system. Then setting the curtain wall height to match the size of the railing he required. As this was only going to be used on a flat level, this was no big deal.

Custom Curtain wall panel:-

r_cw02 

Completed Curtain wall system, as a 1100mm balcony railing:-

r_cw01

Now I can hear all those BIM purists out there shouting me down, saying, but a railing is a railing and a curtain wall is a curtain wall!!! Mr Light a curtain wall is not a railing! What about scheduling!!! Hey????

Now I agree will this, you should use the appropriate tools if you are going to use Revit as a complete BIM tool. But sometimes, you have to break the Revit rules to deliver the design solution and the graphics. In this particular case, the user was more interested in delivering the design and graphics and was less worried about the down stream scheduling benefits. This is a challenge with all us Revit users out there. It probably got more to do with the nature of architecture than anything else. Architects like to design things which are unique, so they can leave a mark on the public and provide a building which is compelling and exciting to look at and use. Revit provides us with an excellent set of tools which allows us to design and document buildings, but these tools only have a certain scope. This is why often I will look at using none standard Revit functionality to solve complex architectural solutions. I am aware of the downstream issues that this can cause and as long as you are aware of this, then to me this is fine. You only need to sit in on any of Phil Reads  AU session on advanced Revit techniques and you will know what I'm getting at. :-)

r_cw03

If you want to take a look at the curtain wall railing file, it can be downloaded from here.

Tools4 Revit

Can across this today and it looks very interesting.....

rafter_plus_1

http://www.tools4revit.com/

Great use of the Revit API!!!!

Revit and Old buildings

Copy_of_3D_View_9

A fellow Revit user and good friend Debs Wilson, has recently modelled Beaulieu Abbey in Revit Architecture 2009, as part of here Talking Walls project. Beaulieu Abbey is in Hampshire, England and is home to the world famous National Motor Museum.

You can find details here....

http://thetalkingwalls-news.blogspot.com/2008/08/building-beaulieu-abbey-revit.html

Back from vacation in France

DSCN2474

Just come back from vacation in France. Great country, great wine and excellent weather. But on my return I discover all hell has broken loose whilst away!!!

Autodesk have finally seen sense and released the Extensions4Revit for Revit Architecture 2009 for subscription customers (hooray!!)

Early bird registration for AU2008 has started!!!! Looks set to be even better and bigger than last year.

The Olympics have started, certainly looking forward to finally seeing BMX racing in the Olympics. They talked about it when I was a kid and finally 22 years on it will happen.

Big one this one; Autodesk have taken the wraps off Revit Architecture Suite 2009.1, Revit Architecture, Autocad and Autocad Architecture 2009 in the same box. How insane is that? Well to be honest, it was only a matter of time before it would happen. It will be interesting to see how that progresses.