Sunday, January 27, 2008
do u revit?
I picked up on this from Steve Stafford, but you may want to check out this new Revit blog from Dave Baldacchino....http://do-u-revit.blogspot.com/. Whats different about this Revit blog, is that Dave is running through some of his Revit construction projects, providing you with an insight into what he has learned and experienced. I look forward to reading more as often we often hear about how companies have implemented Revit but don't get a chance to see the results.
Friday, January 25, 2008
Back of Walls - Project
I thought I like to share this project with you. Before I decide to venture into a fulltime career in Revit I used to work for a firm of Architects based in Winchester, Hampshire, UK , where I was employed as the CAD manager / architectural technologist. I got involved in allsorts of projects which allowed me to use Revit in a real working environment. As a practise, the firm is a very progressive when it comes to technology and they really understand the benefits of 3d design and coordination. I worked there for 10 years so I meet up with a lot of architects during that time.
One of the guys I worked with moved on from the practise a few years ago and went to work for a smaller design practise which focuses on residential design. We continued to keep in contact with one another and around 18months ago he asked me if I’d be interested in doing some design visualisation for him on a project in central Southampton, UK. http://en.wikipedia.org/wiki/Southampton
As you can imagine I jumped at the opportunity. The site is on the line of the old city walls, so it was extremely sensitive with the planners. The site had remained vacant for over 20 years because of the challenges and restrictions that the planning as well as heritage authorities had applied to the site.

The idea was to build a Revit model shell based on AutoCAD drawings and use this model for design review as well as rendering the final model in 3dMax for street scene and impact studies.

During the 18 month period the design had to be changed over 4 times in Revit to meet with various restrictions and refusals. Finally, before Christmas 2007 the scheme received planning permission. Fundamental to the application was the photomontages and the 3d design studies which helped the planning team understand the impact of the proposed building.

 The scheme design consisted of a lot of custom balconies and features which where all modelled up as families, although they required few or little parametrics within the families themselves.

 The model actually didn’t take that long to build, around 4 days in total including the families. The model was then exported to DWG and we used the DWG link within 3dsMax to file link the model into Max for Rendering. The final rendered output where saved as high res TIFF files. These where opened in Photoshop where the views where composed with existing site photographs from a 8mega pixel digital camera.

 What this exercise shows too many is that Revit can be used at all stages of the design process. I speak to a lot of architects about Revit as a design tool and sadly some get it, others don’t. I’ve worked with architects who just don’t believe Revit will replace the traditional CAD process. My view is 2d CAD will not disappear any time soon, but the process of Revit and BIM is starting to take a real hold on the architectural as well as the construction industry. I am definitely seeing that here in the UK. You only need to see the numbers that pitched up for some of the Revit classes at AU2007. Remember when 2d CAD first appeared? nobody believed it would replace the drawing board. You’d be hard pushed to find a drawing board in some architectural practices these days and if they do exist, they are piled up with drawings and print outs!!!
These are electrifying times, Revit may still not have hit the big time for some, but those that have seen the “light”, swear by it. I certainly believe that 2008 will be an exciting year for the further adoption and growth of the Revit platform.
One of the guys I worked with moved on from the practise a few years ago and went to work for a smaller design practise which focuses on residential design. We continued to keep in contact with one another and around 18months ago he asked me if I’d be interested in doing some design visualisation for him on a project in central Southampton, UK. http://en.wikipedia.org/wiki/Southampton
As you can imagine I jumped at the opportunity. The site is on the line of the old city walls, so it was extremely sensitive with the planners. The site had remained vacant for over 20 years because of the challenges and restrictions that the planning as well as heritage authorities had applied to the site.

The idea was to build a Revit model shell based on AutoCAD drawings and use this model for design review as well as rendering the final model in 3dMax for street scene and impact studies.

During the 18 month period the design had to be changed over 4 times in Revit to meet with various restrictions and refusals. Finally, before Christmas 2007 the scheme received planning permission. Fundamental to the application was the photomontages and the 3d design studies which helped the planning team understand the impact of the proposed building.

 The scheme design consisted of a lot of custom balconies and features which where all modelled up as families, although they required few or little parametrics within the families themselves.
 The model actually didn’t take that long to build, around 4 days in total including the families. The model was then exported to DWG and we used the DWG link within 3dsMax to file link the model into Max for Rendering. The final rendered output where saved as high res TIFF files. These where opened in Photoshop where the views where composed with existing site photographs from a 8mega pixel digital camera.
 What this exercise shows too many is that Revit can be used at all stages of the design process. I speak to a lot of architects about Revit as a design tool and sadly some get it, others don’t. I’ve worked with architects who just don’t believe Revit will replace the traditional CAD process. My view is 2d CAD will not disappear any time soon, but the process of Revit and BIM is starting to take a real hold on the architectural as well as the construction industry. I am definitely seeing that here in the UK. You only need to see the numbers that pitched up for some of the Revit classes at AU2007. Remember when 2d CAD first appeared? nobody believed it would replace the drawing board. You’d be hard pushed to find a drawing board in some architectural practices these days and if they do exist, they are piled up with drawings and print outs!!!
These are electrifying times, Revit may still not have hit the big time for some, but those that have seen the “light”, swear by it. I certainly believe that 2008 will be an exciting year for the further adoption and growth of the Revit platform.
Thursday, January 24, 2008
Neutralize those units!!!
It is possible this tip has been blogged before, but it’s worth refreshing just in case. Sometimes there will be situations when creating parameters in your Revit families, when you would like to multiply one parameter by another parameter to get a result. So in this simple example we have two parameters A_length and B_length and we would like to multiply these together to get a resulting new "length". Both parameters have been setup as “length” parameters.
 However, if you do this in Revit you get this!!!! Ouch

What do you mean inconsistent units!!!! I…… don’t bbbbbbbelieve it!! So you swear at Revit and you wonder what your next move should be.
Well you actually have to neutralize the units in one of the parameters to get the result. Revit seems to be rather fussy about multiply two parameter of the same type together. It’s not like Excel. So if you divide one of the parameters by 1, this neutralizes the units and allows the calculated formula to perform correctly.
A_length / 1 * B_length It’s a similar process if you have two “number” parameters and you want to multiply these together to get a resulting “length” parameter. So we have two parameters X and Y setup as “number” parameters. We’d like to multiply these together to get the result as a new “length” parameter.

 Again, we get the same inconsistent units message if we just try to multiply these together.
 However, this time if we multiply one of the parameters by 1 to reinstate the units, the calculated formula will now work.
A_length * 1 * B_length Good luck and happy formula creation.

The natural thing to do would be to create a new calculated “length” parameter and setup the formula as
A_length * B_length
 However, if you do this in Revit you get this!!!! Ouch
What do you mean inconsistent units!!!! I…… don’t bbbbbbbelieve it!! So you swear at Revit and you wonder what your next move should be.
Well you actually have to neutralize the units in one of the parameters to get the result. Revit seems to be rather fussy about multiply two parameter of the same type together. It’s not like Excel. So if you divide one of the parameters by 1, this neutralizes the units and allows the calculated formula to perform correctly.
A_length / 1 * B_length
 It’s a similar process if you have two “number” parameters and you want to multiply these together to get a resulting “length” parameter. So we have two parameters X and Y setup as “number” parameters. We’d like to multiply these together to get the result as a new “length” parameter.
 Again, we get the same inconsistent units message if we just try to multiply these together.
 However, this time if we multiply one of the parameters by 1 to reinstate the units, the calculated formula will now work.
A_length * 1 * B_length
 Good luck and happy formula creation.
REVIT Structure Learning Curve Blog
Thought I’d point you in the direction of a new UK Revit Structure blog http://cadalot-revitlearningcurve.blogspot.com. It has been setup by Alan Wooldridge who is a structural engineer and has just recently started to implement Revit Structure. He is a self claimed CAD-A-Holic (what ever one of those is????) who is a “Power-User” when it comes to AutoCAD, IntelliCAD, Cadvance and Generic CADD, but a complete REVIT newbie. I meet up with Alan just before Christmas at the Excitech Revit User Group meeting. Alan is a enthusiastic guy who is extremely excited about the prospect and direction of the Revit platform. He has some pretty strong views about Autodesk which you may or may not agree with! Finally, he has also is setup a register for UK Revit users. If you are interested take a look at http://www.cadalot.co.uk/revit/UK_Users.htm see also http://cadalot-revitlearningcurve.blogspot.com/2008/01/uk-revit-register.html
Monday, January 21, 2008
New Revit Tools appear on the Revit subscription site
The following two new tools for Revit 2008 have appeared on the Revit subscription web site; these are the Work Sharing monitor and Batch Print for Revit. These are available for all Autodesk subscriptions members running either Revit Architecture, Revit Structure or Revit MEP.
Batch Print
The Batch print tool is designed to allow you to easily print a large number of drawings from a Revit project unattended. Basically, you prepare your default printer or plotter as well as your Revit project. You then use the Batch Print tool to send any number of drawings to your printer or plotter. You can also control the order in which these drawings are printed. Once you start Batch Print no further interaction is required, Revit will handle the rest.
When you first install the Batch Print tool you will be able to find it under the “Tools” pull down menu. On selecting Batch Print the following dialogue box will appear.
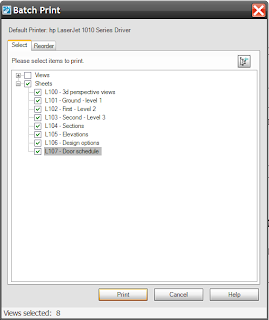 This allows you to select which drawings or views you want to print.
The second tab allows you to reorder your prints.
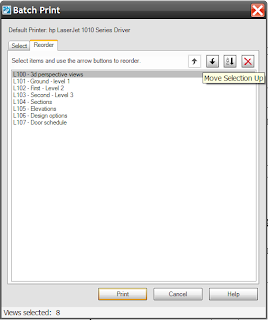 A point to note, which is highlighted in the Readme.pdf on the Subs website, is that Batch Print does not currently work with virtual printers such as DWF or PDF, which is a shame.
“Batch Print is currently not designed to handle virtual printers. A virtual printer typically requires user attention, which Batch Print currently does not emulate.”
Worksharing monitor
 Anybody who is using Revit in a “worksharing environment” is going to find the Worksharing tool a real bonus. In affect the tool answers many queries when working on multi-user project such as…
Who is currently working on this project?
Is my local copy of the project up to date?
When will my Save to Central operation finish?
Has my request to borrow elements been granted?
Are any issues interfering with my work on a Revit project?
I absolutely love the way that Worksets actually work. But for a long time I’ve had some niggling concerns about how users know when things are up to date or why they need to throw a pencil at a colleague to get him or her to relinquish borrowed items!! The Worksharing tool goes a long way to addressing these. The Worksharing tool is only of value to you if you have enabled Worksets and the project is being divided amongst several users. Once you’ve installed the Worksharing tool and you will need to do this on every workstation involved with the project, you can customise the tool in a number of ways to display notification for certain periods of time etc. The interface looks like this…
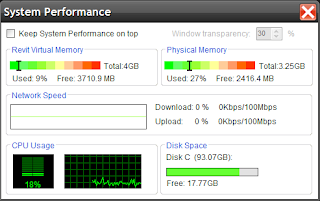
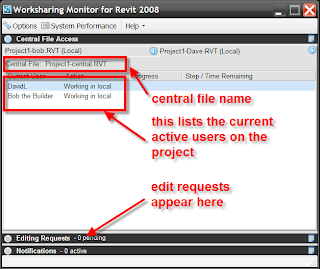 As you can see the current users are listed and this informs other users who is working on the project. You will also notice a “system performance” icon across to top of the window. If you select this, it open up the system performance dialogue which gives you the current status of virtual memory, physical memory, disk space, network speed. This is all extremely valuable information because it allows you to watch for those dreaded out of memory errors that can often occur on large projects.

When you save your file to central, you also get notification that the file was saved successful, which is nice. :-)
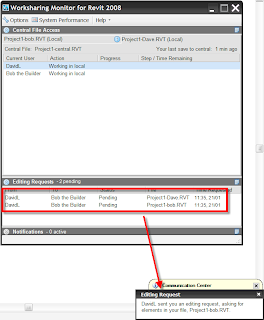
A particularly useful feature is the edit request notification. When you place a request to edit an element somebody else either owns or is currently borrowing, the request appears in the edit request section of the Worksharing monitor dialogue, which I found to be particularly useful.
 There are a few known issues, so again it’s worth downloading and read the readme.pdf which is supplied, but this is an excellent tool which should help to overcome some of the short falls when working on projects with multiply users.
To download and use Batch Print and the Worksharing monitor you must be a subscription users. Login into the Autodesk subscription web portal.
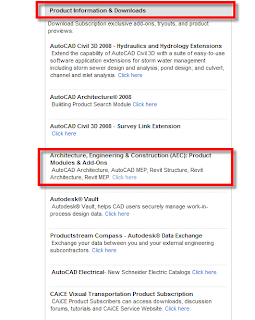
Then scroll down the page until you find the section called “Product Information & Downloads”; just below this you will find a section called “Architecture, Engineering & Construction (AEC): Product Modules & Add-Ons”
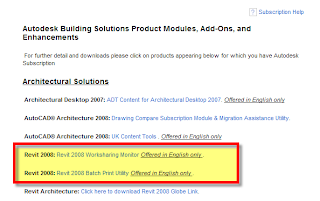
 Select the link.....This will take you to the Autodesk Building solution Products Modules, Addon and Enhancements. Scroll down the page until you find the links to Batch Print and Worksharing monitor.
Batch Print
The Batch print tool is designed to allow you to easily print a large number of drawings from a Revit project unattended. Basically, you prepare your default printer or plotter as well as your Revit project. You then use the Batch Print tool to send any number of drawings to your printer or plotter. You can also control the order in which these drawings are printed. Once you start Batch Print no further interaction is required, Revit will handle the rest.
When you first install the Batch Print tool you will be able to find it under the “Tools” pull down menu. On selecting Batch Print the following dialogue box will appear.
 This allows you to select which drawings or views you want to print.
The second tab allows you to reorder your prints.
 A point to note, which is highlighted in the Readme.pdf on the Subs website, is that Batch Print does not currently work with virtual printers such as DWF or PDF, which is a shame.
“Batch Print is currently not designed to handle virtual printers. A virtual printer typically requires user attention, which Batch Print currently does not emulate.”
Worksharing monitor
 Anybody who is using Revit in a “worksharing environment” is going to find the Worksharing tool a real bonus. In affect the tool answers many queries when working on multi-user project such as…
Who is currently working on this project?
Is my local copy of the project up to date?
When will my Save to Central operation finish?
Has my request to borrow elements been granted?
Are any issues interfering with my work on a Revit project?
I absolutely love the way that Worksets actually work. But for a long time I’ve had some niggling concerns about how users know when things are up to date or why they need to throw a pencil at a colleague to get him or her to relinquish borrowed items!! The Worksharing tool goes a long way to addressing these. The Worksharing tool is only of value to you if you have enabled Worksets and the project is being divided amongst several users. Once you’ve installed the Worksharing tool and you will need to do this on every workstation involved with the project, you can customise the tool in a number of ways to display notification for certain periods of time etc. The interface looks like this…
 As you can see the current users are listed and this informs other users who is working on the project. You will also notice a “system performance” icon across to top of the window. If you select this, it open up the system performance dialogue which gives you the current status of virtual memory, physical memory, disk space, network speed. This is all extremely valuable information because it allows you to watch for those dreaded out of memory errors that can often occur on large projects.

When you save your file to central, you also get notification that the file was saved successful, which is nice. :-)
A particularly useful feature is the edit request notification. When you place a request to edit an element somebody else either owns or is currently borrowing, the request appears in the edit request section of the Worksharing monitor dialogue, which I found to be particularly useful.
 There are a few known issues, so again it’s worth downloading and read the readme.pdf which is supplied, but this is an excellent tool which should help to overcome some of the short falls when working on projects with multiply users.
To download and use Batch Print and the Worksharing monitor you must be a subscription users. Login into the Autodesk subscription web portal.
Then scroll down the page until you find the section called “Product Information & Downloads”; just below this you will find a section called “Architecture, Engineering & Construction (AEC): Product Modules & Add-Ons”
 Select the link.....This will take you to the Autodesk Building solution Products Modules, Addon and Enhancements. Scroll down the page until you find the links to Batch Print and Worksharing monitor.
Monday, January 14, 2008
Revit and 3dsmax workflow document
 Anybody who is either considering or even using Revit and 3dsmax together may want to take a look at this whitepaper released by Autodesk. It provides some very useful tips when working with both products.
New Builds of Revit portfolio released
I am sure many of you will be aware of the Jan 2008 bug that has hit the Revit portfolio. To cure the problem Autodesk have released new builds of Architecture, Structure amd MEP build(20080101_2345). They can be downloaded from:-
Architecture
http://usa.autodesk.com/adsk/servlet/index?siteID=123112&id=9262388
Structure
http://usa.autodesk.com/adsk/servlet/index?siteID=123112&id=9339705
MEP
http://usa.autodesk.com/adsk/servlet/index?siteID=123112&id=9262907
Architecture
http://usa.autodesk.com/adsk/servlet/index?siteID=123112&id=9262388
Structure
http://usa.autodesk.com/adsk/servlet/index?siteID=123112&id=9339705
MEP
http://usa.autodesk.com/adsk/servlet/index?siteID=123112&id=9262907
Subscribe to:
Comments
(
Atom
)