Showing posts with label why?. Show all posts

Thursday, November 22, 2012

Can’t schedule wall constraint - part 2

Following on from last weeks post about not being able to schedule the wall constraint, I noted it can be done via the API; it can also be done via an odbc export or even in tool such as Ideate BIMLink. Now, I am no API guru, so I had call on my good friend & fellow CASE Inc colleague, Don Rudder to help me out. Fortunately, I come up the problems & shoot them over to him, for him to weave his magic! So this is a sneak peak at a tool which will be released, hopefully, in December as part of CASE-apps. The tool in essence allows you to get access to any parameter from any category & pass it to a target parameter.Steps are:-

  • Select a category
  • All parameters can be used as the source for data
  • Only Non Read-Only Text parameters can serve as the target (where the data from the source will be sent)
  • Select a data format option (human readable would be 2’-6” as opposed to 30.0)
  • Click OK

clip_image002

When the tool is run, if it encounters an group, it will throw up the following warning message as it tries to ungroup the elements on the fly & write the data. If you have lot of groups, this could take some time to go through clicking the “ok” button, however it will be quicker than manually inputting the data.

clip_image003

A resulting dialog shows a count of errors will then be displayed.

clip_image005


Monday, March 19, 2012

Panic in the streets of London!

Any Smiths fan will recognise this line ;-)…..so one of our BIM coordinators contacted me today. Panic! “Something weird is happen with all our filled regions! They were correct, now they are masking everything! They are set to transparent, but they still don’t display correctly”….so they wanted them to display like this…

image

They are displaying like this on all our sheet views! What the hell? We just can’t afford to have this sort of thing happen, we have a major deadline.”

image

Not sure why this is happening, as the filled region is indeed set transparent. It seems like it got confused between the 2 settings of transparent & opaque in the filled region type properties. I am positive I have seen this issue before. Anyway, some further investigation & I noted the view was set to wireframe. Change back to hidden line & the problem was “Panic” over, now its time to hang the DJ.

image

Friday, September 09, 2011

What a piece of junk!

Still working progress, but I thought I’d share. Why Vasari & Revit is my hobby as much as its my job!

image

image

image

millenium_falcon_vasari_4

Tuesday, May 03, 2011

Off Topic – Hobbies, BMX, Revit

So this is a little off topic, but I thought it was worth sharing. So when I’m not geeking with Revit or spending time with my family I do have a hobby which harps back to my youth! I am 80’s child at heart and one of the cool things that came out of this era was BMX! So when I have time, I like getting knackered and trashed BMX bikes and refurbishing them back to their former glory. If you don’t know much about BMX, the craze started back in SoCal in the early 70’s, but really hit the big time in the 80’s. After dropping off the radar due to the mountain bike movement, its more recently hit the mainstream once again, with BMX heros like Mat Hoffman and Dave Mirra helping to drive the sport forward. BMX racing is even an Olympic sport.  One particular firm which I have a lot of respect for is S&M Bikes, American owned, American made, these bikes have collected a cult following over the years. Anyway, a few years back I bid for a S&M Dirt Bike frame on Ebay, the image is below. I knew exactly what it was when it appeared on Ebay and was determined to win this!

09-06-13_ebay dirtbike

Anyway, I did win and I didn’t pay over the odds. When the frame & forks arrived I stripped it of all it parts.All the value was in the frame and forks; hand made in the USA from 4130 cromoly tubing.DSCN3811

I then stripped it back to bare metal.

DSCN4309

I got the frame & forks powder coated red, as near to the original RAL colour as I could. But I also wanted to recreate the decals. I managed to get the original decals off the frame ok, which I then scanned in on my Mac. After cleaning the scans up in Photoshop, I then fired up Revit! I created a new drafting view and imported the jpeg scan.

image

I then traced over the scan using detail lines and solid fills to end up with this exact copy of the original artwork.

image

I then tracked down a firm on the internet which supplied clear decal sticker paper and printed the art work using my Epson Inkjet printer.

2011-05-03 20.51.41

Then all I had to do is get the decals onto the frame!2011-05-03 20.58.38

So this is the completed bike!

2011-05-03 20.59.39

So the next time somebody tells you that you can’t do that it Revit, you tell em’ that Revit can even do artwork !!! BTW, if you have old bmx bike or frame, I am particularly interested in tracking down  Skyway TA frame & forks, Haro Master or Haro Sport from the mid 80’s, let me know.  :-)

Thursday, March 31, 2011

Size isn’t everything

I am currently building some title blocks for one of our clients. I had just completed the A1 sheets and everything was going swimmingly….next up A0 sheet. Let me explain my process; I always use the out of the box title block templates…import a DWG, as often you are just recreating a DWG variants in Revit. Then I trace over the imported DWG add linework, parameters, logos etc. Then I copy to clip board, start yet another new template and paste in what I previously create. The reason being is I don’t want all the embedded DWG “stuff” sneaking its way into my spanking new title block.

image

Anyway, the point of this post is when I got to the A0 out of the box template I noticed a minor error.  So the ISO A0 size is 1189 x 841 right? The out of the box Revit A0 template is 1190 x 840…..ok 1mm is 1mm and its only small, but this really is a genuine mistake. Lets hope this is sorted for RAC 2012.

image

Monday, March 14, 2011

Collecting packaging

I’ve read it somewhere that there are people who collect packaging…much like people who collect say Star Wars toys or model trains; people also collect things like old cereal packages and coke cans. Weird….anyway, in the early days of Revit I started collecting old Revit installation CD / DVD packages. I recently found a version or Revit 4.1 to add to my collection! (pre-Autodesk) Mind you I am sure there are some out there who will have versions older than 4.1.

IMAG0183Sadly my collection hit a barrier when I went to work for the reseller as we didn’t get our software sent on media; instead it was downloaded from a secret Autodesk media website. :-) But then my media collection was always destined to meet a rapid end when Autodesk moved from supplying media to internet based distribution. Shame really, as my collection will go no further than Revit 9.1.

2011-03-13 11.09.46

Thursday, June 03, 2010

Getting ripped off

Now I think I’m a reasonably relaxed sort of guy (my wife would probably say different! :-) ) But a good friend of mine passed this link to me today. It would seem somebody has been passing off my blog articles as theirs. They do at least make reference to the source.

http://revitinfo.com/Revit_Forum/Entry_Details/EntryID/223.aspx?&getindoolabinfo=aboutlink

Whilst I’m not that precious about what I write about, I little bit of credit or just a quick email to say, “hi, you ok if we link to your article?” wouldn't have gone a miss. Now I would probably say no problem, just make reference to who wrote the article. I remember Steve Stafford highlighting a similar issue around 12 months back and he wasn’t exactly thrilled by it then and either am I.

Thursday, November 26, 2009

Pumpkin heads to Las Vegas

Remember the pumpkin modelling competition run by Zack Kron back in October?

From this…….

image

To this…….

image

Well as a winner of the Goodest category, he has kindly produced a printed 3d version of my winning designing. Unfortunately Zack can’t be at AU in person, which is disappointing, but he is having the pumpkin model sent to AU where I will pick it up. A big thanks to Zack for this and my kids are gonna love it!

Wednesday, November 04, 2009

My Pumpkin wins a prize!

image

My thanks goes to Zach Kron at Buildz blog for running the inaugural pumpkin modelling competition! My modelling effort managed me a first in the “good” category and my collegue William  managed a first in the “mostest parametric” category, with his stunning Grasshopper Rhino pumpkin, a big UP for the HOK boys!

It was certainly a good laugh, but for me its actually a great learning exercise, because you can push the tools of your trade in a direction which you wouldn’t normally get a chance to do. This will reap benefits when you come to have to create something on a real project, not that you will see many pumpkins in my projects! :-)

image

I had to jump through a few hoops to get to the end solution, but I applied a bit of Revit purist approach to solving the problem, which you can view in this video. Enjoy and I hope it inspires.

Tuesday, September 29, 2009

William’s Parametric Bridge Recipe!

As promised, my colleague William Lopez Campo emailed me the Parametric Bridge Recipe he used for his winning design as last weeks Berlin Design Slam!

bridge_recipe

Ingredients consisted of :-

  • Context Mesh X1
  • Parametric Void X1
  • Parametric Controlling Box X1
  • Variable Parameters X4
  • A-Level Formulas X3
  • Place Holder Family X2
  • Basic Solids X3

Method :-

  1. Open Context Mesh, add slab and slab edge to form the base of the bridge.
  2. In a bowl mix parametric box, the controlling parameters and the variable with A-level formulas to get a formula driven box.
  3. Generate the solids from the edges of the box, so they follow the constraints of the ‘formulas’.
  4. Load the parametric assemble in the first place holder family, and this one in the bridge.
  5. Create various box types for the shape to follow alternative shapes and assign instances of the place holder family.
  6. Refine position and mirror along axis of the bridge.
  7. Replace placeholder with full instance version and simmer a few minutes.

IMAGE-04

Monday, July 20, 2009

More Spikey Panel fun! ;-)

image

Thought I'd share these with images with you. I took the panel pyramid from last weeks post and added a height parameter to the panel. This allowed me to adjust the apex of the pyramid. I then just loaded the family back into the massing family, adjusted the panel height parameter to give me a really spikey form!

image

image

Friday, October 17, 2008

Challenges with cw panels

A reader asked me this question the other day......

"Was trying to do a special deck after converting the flat roof to a sloped glazing and my loaded curtain panel got the following message....."

image

This is Revit's polite way of saying "go take a long walk off a short pier; I ain't trying to fit that cw panel into that curtain grid!" If the cells of the curtain wall are not rectangular because maybe you've changed the grid pattern angle and you then try to include a custom cw panel which won't actually form to the cell, you will get the above message.

I generally try to keep my curtain wall grid angles always at 0 degrees, agreed this is not always possible. But where I need to create a panel which is a custom shape, I create a generic family  and the load this into a cw panel, being mindful that the panel needs to repeat. What we need is the ability to create complex panel systems without having to resort to rectangular grids.

Wednesday, August 13, 2008

Curtain Walls as Railings

I read with interest Steve Staffords recent blog with regards to the challenges of configuring railings and I have encountered similar issues. I was also surprised to see his statement about the use of railings in the early days having similar functionality as curtain walls.

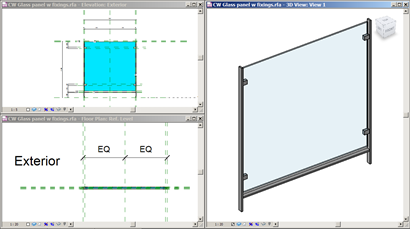
Around 18 months ago I received a query from a Revit user who was having issues using one of the stock railing families which is supplied and can be found in the system family files when you install Revit Architecture. The user simply wanted to use system railing family called "Commercial - Glass w Fixings" on a balcony, however with all the will in the world he could not get the family to work correctly, especially as the balcony was not them deep.

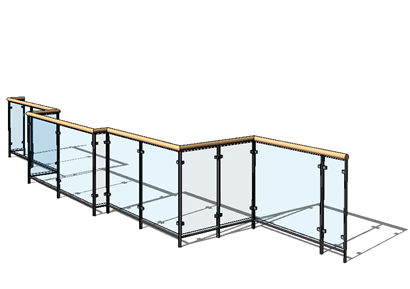
In reality he may of been better off creating a custom family to suite the condition, but not every balcony on the project was identical. He also wanted to flexibility to rapidly change the design of the railing as required. So what I suggested was creating a custom curtain wall panel and nesting this into a curtain wall system. Then setting the curtain wall height to match the size of the railing he required. As this was only going to be used on a flat level, this was no big deal.
Custom Curtain wall panel:-

r_cw02 

Completed Curtain wall system, as a 1100mm balcony railing:-

r_cw01

Now I can hear all those BIM purists out there shouting me down, saying, but a railing is a railing and a curtain wall is a curtain wall!!! Mr Light a curtain wall is not a railing! What about scheduling!!! Hey????

Now I agree will this, you should use the appropriate tools if you are going to use Revit as a complete BIM tool. But sometimes, you have to break the Revit rules to deliver the design solution and the graphics. In this particular case, the user was more interested in delivering the design and graphics and was less worried about the down stream scheduling benefits. This is a challenge with all us Revit users out there. It probably got more to do with the nature of architecture than anything else. Architects like to design things which are unique, so they can leave a mark on the public and provide a building which is compelling and exciting to look at and use. Revit provides us with an excellent set of tools which allows us to design and document buildings, but these tools only have a certain scope. This is why often I will look at using none standard Revit functionality to solve complex architectural solutions. I am aware of the downstream issues that this can cause and as long as you are aware of this, then to me this is fine. You only need to sit in on any of Phil Reads  AU session on advanced Revit techniques and you will know what I'm getting at. :-)

r_cw03

If you want to take a look at the curtain wall railing file, it can be downloaded from here.

Tuesday, July 08, 2008

Revit MEP 2008 project upgrade, suddenly spaces appear

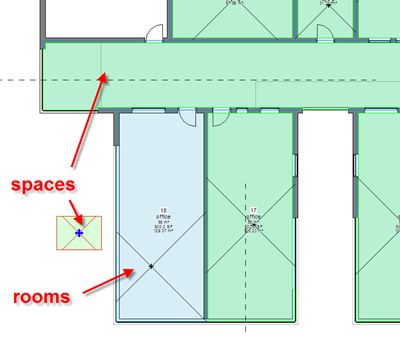
I discovered something strange today. I opened up a Revit MEP 2008 file into Revit Architecture 2009 and on completion of the project upgrade I found that as well as having rooms in the models, I also had the new Revit MEP 2009 spaces included! Now I hadn't expected this to happen, so I open the same file in Revit MEP 2009 and on completion of the project upgrade the model that also included the original rooms as well as the new space objects. I then started a new Revit MEP 2008 project from scratch and added some rooms and did the same exercise of opening the file in RAC 2009 as well as MEP 2009. This time, no space objects! Weird.....

space_img 

So I went back to the 2008 version and checked all my area and volume settings were set correctly. Everything was fine. What I then remembered was that I had run an IES heating and coolings load calculation on the model even though I hadn't saved the reports that IES had created. So to test this I created a new model in MEP 2008, added some rooms and ran a heating and cooling loads report. I then opened the model in Revit Architecture as well as Revit MEP 2009 and hey presto "spaces" as well as "rooms".

Friday, June 27, 2008

10 Reasons to use Revit

I received this email the other day from a fellow Revit user, entitled "Reasons to use Revit". You may have seen some of the images before, some are spoof, others are real but I thought it worth sharing. If anyone ever questions why you using Revit, show them these beauties, ( cheers Chris)  it certainly made me smile. :-)

1. Camera views????

1 

2. Clash detection.......

2

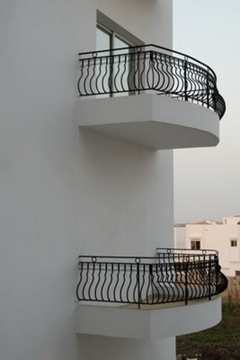
3. Parametric's gone wrong

4

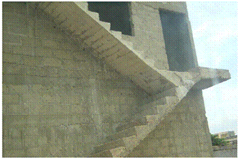
4. A new form of fire escape

5

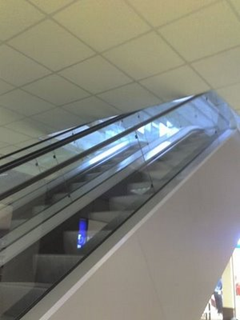
5. Escalators for the vertically challenged

6

6. When parametric change fails to deliver...

7

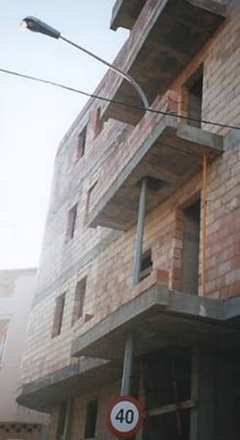
7. Reduce your carbon footprint; borrow light!

9

8. No guests allowed

10

9. Combating the Credit crunch

11

10. A Classic!!!!!

12

Wednesday, June 25, 2008

Problems linking large DWG's?

Ok, its a fare cop! I haven't posted anything useful for sometime and I'm feeling slightly embarrassed about it.You only need to see the activities of others; for instance my fellow blogger Mr Stafford has been very, very busy. :)

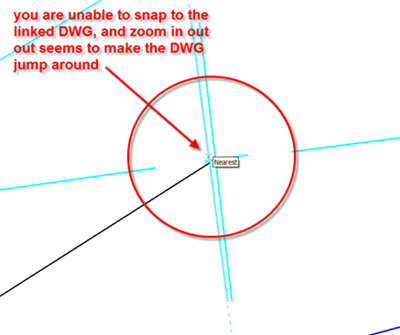
Anyway, I came across this issue recently with linking large DWG's plans into Revit and I thought I'd share my findings. As many of you may know Revit is not particularly happy about having large DWG's dumped into its environment and often it will kick you in the teeth. It certainly doesn't take any prisoners! So a few weeks back I received an email from a good friend of mine saying that he was having a hell of a job linking in a very large DWG into Revit. Now he is a very experienced user so he certainly knows what he's was doing. He found that when he zoomed into the linked DWG, things seem to be jumping around. So he emailed me the DWG for me to take a look at and sure enough Revit would happily allow you to link in the DWG. However, when you tried to zoom in within the view and snap either a reference plane or linework off the DWG to allow you to place an coordinate, the view did jump around! Very bizarre... Now I had seen this behaviour before, but I thought it had been resolved in a previous release. This whole situation makes the process of sharing coordinates difficult as you can’t get the coordinates to read correctly from the linked DWG. First off I thought it was related to the Revit environment not liking the very large DWG. If you take a look at the image below you will hopefully understand the issue.

Picture1

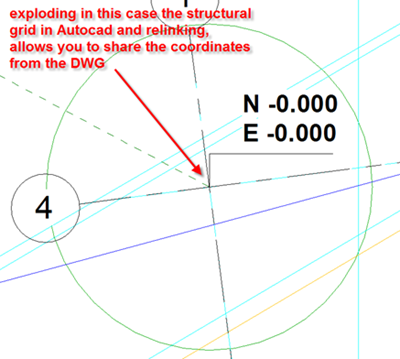
So I decided to go back to good only AutoCAD and open up the DWG to see if I could track down the issue. What I discovered is that the DWG contained a number of blocks and one of these was the structural grid. After a quick "explode" of the blocks within the DWG (something I don't always like doing) and then a re-link, everything was fine and you could link and share the coordinates without any issues what so ever. If you take a look at the image below you will see the DWG with the exploded blocks and that you can now place coordinates and geometry.

Picture2


So the moral of this story is to check whether any DWG you may be linking contains blocks, because if it does you make have issues sharing coordinates or even working on the linked DWG. By the way, this issue has been reported to Autodesk, so lets hope they can resolve this annoyance in future releases.

Thursday, March 27, 2008

Render quality in Revit Architecture 2009


Chrome balls!!! Yes that's right and you may be asking why.....???? I just wanted to show the render quality and reflections that can be achieved with the Mental Ray Renderer in Revit Architecture 2009.