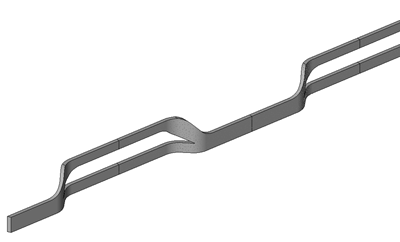
I showed the image below on a blog post from last year and back then somebody did question how I put it together. I've updated the model for RAC 2009 as I was keen to see how it would render, so this post is really a follow on from the initial question.
Background
The example is actually a proof of concept. I was at an Autodesk Tech Camp event in Europe last year, when somebody from one of Autodesk distribution companies showed me an example of a project in Denmark called the Light*house. They asked me whether I thought it was possible in Revit? Always up for a challenge and more than happy to share my ideas, I opened up my laptop and within an hour I'd come up with this. The panels are not parametric, although if I'd spent more time, I'm sure I could have made them as such.
How they where created
I started with a generic family, which included an extrusion and a void extrusion to get the initial shape of the curtain wall panel. I made sure that the family was built around a series of reference planes based on the end size of the resulting panel.
The resulting generic family was then loaded into a curtain wall panel family. I then locked and aligned the generic family to the curtain wall panel families reference planes.
I also added a double horizontal control which allows me to flip the panels where required within the curtain system.
Next I started a new project and created a curtain wall system. I then modified the system to the exact sizes of the previously created panel.
I then loaded in my custom curtain wall panel and swapped out the default glass panel for my panel. By default all the panel will be in the same direction on plan. So to get the flowing stepping "in and out" that the facade required, I just flipped every other panel, as per the image below.
As the curtain wall system only spanned between two levels, I copied the system already created up to the second level. I then adjusted the panels to meet the requirements of the pattern at the second level. Once completed the two systems where copied up to complete the image below, it was as simple as that!


4 comments :
thanks for posting detailed info about this one, i love it, i think it looks great! thanks a bunch, gives me some ideas and helps in explaining the power of curtain walls to others.
a few questions:
1) what is the advantage of doing that as a generic model within a curtain wall panel family? why not just build it from the curtain wall panel template?
2) it looks like the ends meet very cleanly in the corner view... how did you get the panels to miter that well?
thanks! great post!
-dan
Hats off to the curtain-wall master :) Very nice work. Looks complex but it was incredibly simplified into one essential component. Thumbs up!
Hi I am in the process of creating a curtain wall which has got a pattern made aout of ceramic tiles. The thing is that my wall does not end in a straight line or is not made up of the module of the tiles. So this means that i would have to trim the curtain wall panels to suit the curve that i have. But i cant trim it. is there a way to do this?
Post a Comment